Frank N Truck

Yukon Stihl

Ligma
Nov 25, 2020
3,052
25,144
113
Started on a new project
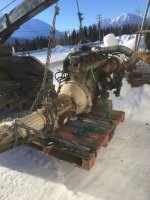
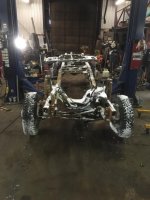
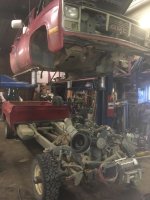
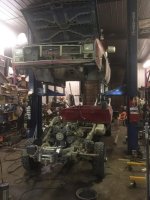
94 Ford Superduty 4x4 frame,has 10 bolt wheels and disc brakes on all wheels, 97 5.9 Cummins 5 speed, and probably a 86 Chev square body crew cab.
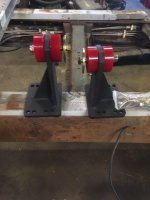
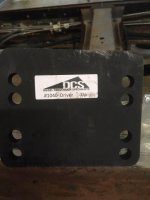
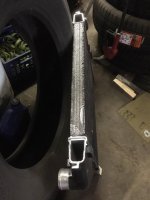
Bought a bunch of parts from Diesel Conversion Specialists to help the project along. Nice parts.
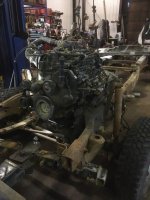
Got the engine mounted in the frame for the first time,that was probably the easy part as i think about everything that needs to get married up.
Have a junk cab without windows that i can stick the forks through for mock up and making things work.
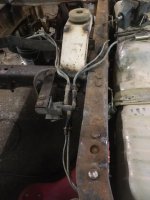
Issues to work out, may have to stretch the frame depending on final cab choice and whether i put a deck or box on it. Fuel tank/tanks that will work with gauges. I want to use the Ford rad and rad support but will have to marry some of the gm support to it for mounting fenders and hood, need to fab in some inter-cooler mounts on the rad support, cab mounts. Brakes and steering should be fairly easy using a hydrobost off the existing pump on the Cummins.
As i may be selling the shop i figured i better get started. The engine should be low mileage,i bought it from Harold who started his conversion project in 1999 and never did get to driving it.
Harold died this summer, i hope i get it driving before the same happens to me.
 

Attachments

  • frankstank 5.jpg
    frankstank 5.jpg
    87.1 KB · Views: 18
  • frankstank 2.jpg
    frankstank 2.jpg
    65.7 KB · Views: 14
  • frankstank 3.jpg
    frankstank 3.jpg
    50.9 KB · Views: 12
  • frankstank 4.jpg
    frankstank 4.jpg
    88.9 KB · Views: 14
  • frankstank 6.jpg
    frankstank 6.jpg
    78.3 KB · Views: 16
It was nice and warm yesterday so i got the donor truck out of it's winter parking spot.
Going to get it inside on the hoist to make sure it's as rust free as i remember.
It's been parked in the winters, and was used in the summers first by a fishing lodge, then became the mining truck so it got washed crossing creeks flushing out the bottom of it multiple times a year
I may give up the idea of using a junk cab, and pull this one to do the fab work and leave it on the frame.
Seemed happy fired right up and drove out of it's winter grave, i have a donor red Suburban with a nice front clip and good doors. It's the same year so the paint should be a pretty close match.
 

Attachments

  • red crew.jpg
    red crew.jpg
    95 KB · Views: 7
  • red crew 3.jpg
    red crew 3.jpg
    86.8 KB · Views: 6
  • red crew 2.jpg
    red crew 2.jpg
    91.8 KB · Views: 6
  • red crew4.jpg
    red crew4.jpg
    70 KB · Views: 8
Yesterday was separation day
Today i switch frames and do a test fit.
Then start building body mounts. 8 points of contact, i am hopping that i can use the original rad support mounts on the ford frame. But some measuring i did makes me doubt it.
 

Attachments

  • red crew6.jpg
    red crew6.jpg
    77.8 KB · Views: 5
  • red crew5.jpg
    red crew5.jpg
    83 KB · Views: 8
Your project brings back memories of a truck I built many years ago.
1972 Chev 3/4 ton 4wd frame. 1966 Chev Eaton, dually rear axle, leafs and shackles. 1974 454, turbo 400, New Process 205. 1976 Chev cab. It had a short stepside box that I had made with 1955 stepside fenders that I put on backwards cause they fit the wheelbase better that way. I put a tow truck boom in it and used to tow a fair amount of scrap. I put a snow plow on it too. It was ugly. I'll dig out a picture some day.
I still have the stepside box. I made it into a trailer.
 
Got the frames switched in the shop yesterday and lowered the cab down to access what needs to be done.
Plan for the day is to move the engine trans ahead 2 inches and see where the frame and cab want to play with each other.
By the looks of it the frame will have to be lengthened under the cab for the foot wells of the crew cab
Did some test fits of the rad and intercooler on the rad support. The cab may end up a little higher than on the stock frame to get the rad support under the GM hood,which wouldn't hurt my feelings. Then i might go with bigger wheels and tires to offset the low gears in the diffs
 
Your project brings back memories of a truck I built many years ago.
1972 Chev 3/4 ton 4wd frame. 1966 Chev Eaton, dually rear axle, leafs and shackles. 1974 454, turbo 400, New Process 205. 1976 Chev cab. It had a short stepside box that I had made with 1955 stepside fenders that I put on backwards cause they fit the wheelbase better that way. I put a tow truck boom in it and used to tow a fair amount of scrap. I put a snow plow on it too. It was ugly. I'll dig out a picture some day.
I still have the stepside box. I made it into a trailer.
I was looking for a good 60's cab.
Briefly considered a 70's as i have a few of them.
I did pick up a Ford F550 4x4 Powerstroke with a fucked cab last summer so i decided to flip the engine 7.3 Diesel as everyone is looking for them.
I have another Cummins with a busted Auto trans.
If this build doesn't sour me on re bodying trucks, that one will get the Cummins mated to the ford trans and drive train with a 60's truck cab that i have a line on. So long as i can find a stand alone controller for the Ford Auto
 
Engine got moved
Cab touched the frame where i figured it would
Engine package is going back into storage as i deal with lengthening the frame. That will be a first for me.
Where it need to be lengthened isn't a great spot as the frame rails are not parallel, straight or level.
Measure and cut once i hope. I will make a boxed frame at the spot i cut it as getting a channel is not possible to slip inside the existing frame.
I was always told they were stronger if they were cut on a diagonal but we did lots of dump trucks and just butt welded them square , I don't remember one ever breaking or even cracking. The old Louisvilles with Hendrickson walking beam suspension were kinda famous for cracking in between the spring saddles. The Internationals will crack right behind the cab and the ones with the heavier frame seem worse than the regular size ones. Probably not too critical for you since you won't be working this thing too hard. It would be better to stagger the cuts side to side.
 
I did get the frame cut yesterday
There was only a very short area that was straight to accomplish the cut in, i was hoping for a longer angle but 3" was about the total area that was suitable to accomplish it in, which ironically was about the lenght that needed to be added.
I used channel iron to make a slide,welded it to the frame parallel and level to each other.
Then after lots of deliberation with myself, i popped my cherry and cut the frame.
Got it beveled and ready for the new pieces.
I should have welded a few cross braces to the existing frame as when it was finally cut it sprung out a bit on the one side.
The drivers side stayed pretty true,so i will start by tacking it back together and then pull the passenger side true.
I center punched the frame to put a diagonal measurement on it before final welding.
I will box the inside rail for extra strength.franknframe.jpgfranknframe2.jpgfranknframe3.jpgfranknframe4.jpg
 
Last edited by a moderator:
Got the frame welded out and moving on to getting the rad support done.
That was a bit of work for a 3" stretch
Got a Dodge inter-cooler at a place i picked a bunch of junk and saws from a few summers ago which fits the ford rad support great and will not need any fab work on the inter-cooler other than making some mounting brackets.
Once i get it mounted then i can fit it under the gm hood and that will set my cab height and then cab support brackets.
The cab fits better now, but i will still need to take a notch out of the frame where it comes back up and levels out.The one set of cab mounts is right there so it will be a two fer as i can notch the frame and make cab supports all in one.new frame 1.jpgnew frame 2.jpg
Boxed the inside which i forgot to take any pictures of, not going to grind the welds on the inside plates, will spray some primer over the welds but not like it will last long or paint the frame. Work truck.
 
Got the rad support roughed in will have a couple inches clearance between the rad and fan.
Room up front for the inter cooler behind a stock grill.
With the rad support roughed in it gave me the ride height for the cab on the frame and parallel so if i use the truck box it will be an easy job to mount it.
Imaginered the cab mounts yesterday and started the middle ones for the cab.They are the most complex as i will have to notch them into the frame.Once they are tacked in place i will set the cab on them and check everything again. The other 4 will be pretty straight forward. Then do the final welding on the rad support and frame mounts for it.
That will conclude getting the cab mounted, will toss the engine and trans back in before it gets bolted on.crew cab rad support.jpg
 
Yesterday was a milestone i got the hardest cab mounts built and in place in the frame
The rest will be a lot easier as no cutting on the frame will be required.
I got to use my lathe for making this set,use being a very loose term as any machinist would have done a face palm.
I had a chunk of bogie rail from a reefer with just about the right sized holes so i cut a couple holes out of it and turned them round,then opened the holes up for the cab bushings.Welded them to the top of some pipe and cleaned up the welds.Had to turn down the cab bushing washers to fit inside the pipe. And there was just enough room for the bolts to go up beside the frame into the cab mounts,so the bolts were shouldered which didn't work without turning the shoulders off of them.
Mounts are in place,i will triple check the cab to frame placement then weld them in place.
The rest of the mounts will be a modification of existing mounts. Rad support mounts will be cut off and moved forward about 4" then the final welding will be done on the rad support.Crew cab mounts 1.jpgcrew cab mounts 2.jpg
 
Got all the body mounts built and welded before our snow event.
Building the rad support and mounts is next.
But going to switch projects for a few days.
Going to spend a day welding on my buncher finish it up and go clear-cut a lot i bought before all the snow is gone and frost leaves.
 
Got the rad support finished and reinstalled. Adapted frame mounts for it they just need to be welded to the frame.
Also got the steering figured out.The Ford shaft had a section that the GM shaft would slide inside so it was just a measure and cut solution. The angels are right at the max of stock componates so i will see how it lasts. May have to revisit it in the future with some ujoint goodies,but for now i have steering.Will have to reclock the steering wheel so it's not to weird looking inside.
I decided to used the complete fuel system from the original frame then the GM switch and guage will work.crew rad support.jpgcrew stearing.jpg
 
Update...
No piv's
Got the fuel tanks mounted to the frame yesterday. Now mount the tank switch and lines
The hood latch on the hybrid rad support hit the inter-cooler, so i cut the top couple inches off and will have to get the tanks welded up. I am not set up for aluminum welding yet.
Will be setting the engine package back in soon and decipher the wiring soon. Change some sensors to GM for the oil pressure and temp assuages.
Brakes should be straight forward. I will do a line lock for a parking brake
Need to find a solution for the speedo
I will have to order drivelines as soon as i am happy with the engine package placement
 
Piv's
Fuel system from the donar GM, switched sides of everything as it wasn't a direct remove and remount because...
Cut inter-cooler
 

Attachments

  • crew fuel system.jpg
    crew fuel system.jpg
    72.3 KB · Views: 4
  • crew intercooler.jpg
    crew intercooler.jpg
    58.5 KB · Views: 4